Zeiss Blue Light Scanner Revolutionizes Part Digitization with High Precision!
By Ashutosh Arora
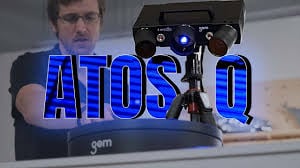
Zeiss Industrial Quality Solutions has unveiled its innovative ATOS Q Blue-Light 3D Scanner, a cutting-edge solution designed to accelerate the digitization process across various industries. This compact, high-performance scanner combines advanced electronics, optics, and robust software, providing exceptionally precise measurements for parts ranging from small to medium sizes. Whether used in product development, quality control, or production, the ATOS Q is set to redefine how companies approach part measurement and digital twin creation.
The ATOS Q is a versatile blue-light 3D scanner that captures high-definition, highly accurate 3D scans of a variety of objects, including components, assemblies, tooling, and molds. This scanner is perfect for industries ranging from medical and automotive (including new energy vehicles), to aerospace, power generation, and electronics. The ATOS Q accelerates the digitization process, providing manufacturers with an invaluable tool to create accurate digital twins of physical parts. The scanner is engineered to handle a wide array of materials, including cast parts, metal-formed components, and injection-molded objects, ensuring precision across different manufacturing processes.
By capturing millions of data points through quick scans, the ATOS Q creates high-definition files with intricate feature details. This ability to rapidly digitize objects significantly enhances workflows, enabling smoother and faster production and development cycles.
One of the key strengths of the ATOS Q lies in its compact design. With a small footprint, this 3D scanner is portable and can easily be integrated into various production environments. Its interchangeable measuring lenses further enhance its flexibility, allowing it to adapt to different scanning needs. Whether for dimensional inspection, reverse engineering, rapid prototyping, or finite element analysis (FEA), the ATOS Q delivers precision and versatility for a wide array of tasks.
The ATOS Q scanner boasts a measurement capability of 8 million to 12 million points per scan (PPS), ensuring quick, detailed, and accurate results. Additionally, it utilizes Triple Scan Technology, which reduces the number of individual scans needed, thus speeding up the measurement process—even for more complex parts. This advanced technology is vital for businesses looking to streamline operations, improve throughput, and maintain the highest standards of quality control.
Moreover, the blue LED light equalizer used by the ATOS Q enhances the clarity and reliability of measurements, while the active temperature management system ensures stable performance, even in varying environmental conditions. The inclusion of fiber-optic connection ensures rapid data transmission, further enhancing its efficiency in fast-paced production environments.
The ATOS Q is designed to be flexible in terms of setup and operation. It can be used in several configurations, including a tripod, industrial camera stand, desktop stand, or fully automated systems such as the Zeiss ScanCobot or Zeiss ScanBox Series 4 automated measurement cells. This adaptability allows it to fit seamlessly into existing workflows, whether in small-scale, manual operations or large-scale, automated production lines. Additionally, the scanner can be integrated with rotation tables or a tilt and swivel system for semi-automated applications, making it ideal for facilities looking to scale their operations.
For users with diverse measurement requirements, the ATOS Q offers five interchangeable measuring volumes that range from 100 × 70 mm² to 500 × 370 mm², accommodating a wide variety of part sizes and shapes. This scalability ensures that manufacturers can rely on the ATOS Q for both small and large components without compromising precision or efficiency.
To complement the hardware, the ATOS Q is supported by Zeiss Inspect Optical 3D software, which enables advanced analysis and processing of scan data. This software streamlines the entire inspection process, allowing for the creation of high-quality 3D models, and ensuring that users can meet the stringent metrological requirements demanded in modern manufacturing environments. This integrated approach ensures that the ATOS Q provides not only high-quality scans but also the tools needed to make critical decisions based on accurate data.
Zeiss’s ATOS Q Blue-Light 3D scanner is a game-changer for industries looking to enhance their digitization capabilities. With its precision, compact design, and advanced measurement technology, the ATOS Q empowers manufacturers to rapidly and accurately convert physical parts into digital models. By offering fast, high-quality scans, reducing measurement times, and ensuring consistency across diverse applications, Zeiss is paving the way for smarter, more efficient industrial processes. This technology is a vital tool for companies seeking to stay ahead in a fast-evolving manufacturing landscape, driving innovation and accelerating the adoption of Industry 4.0 technologies.


