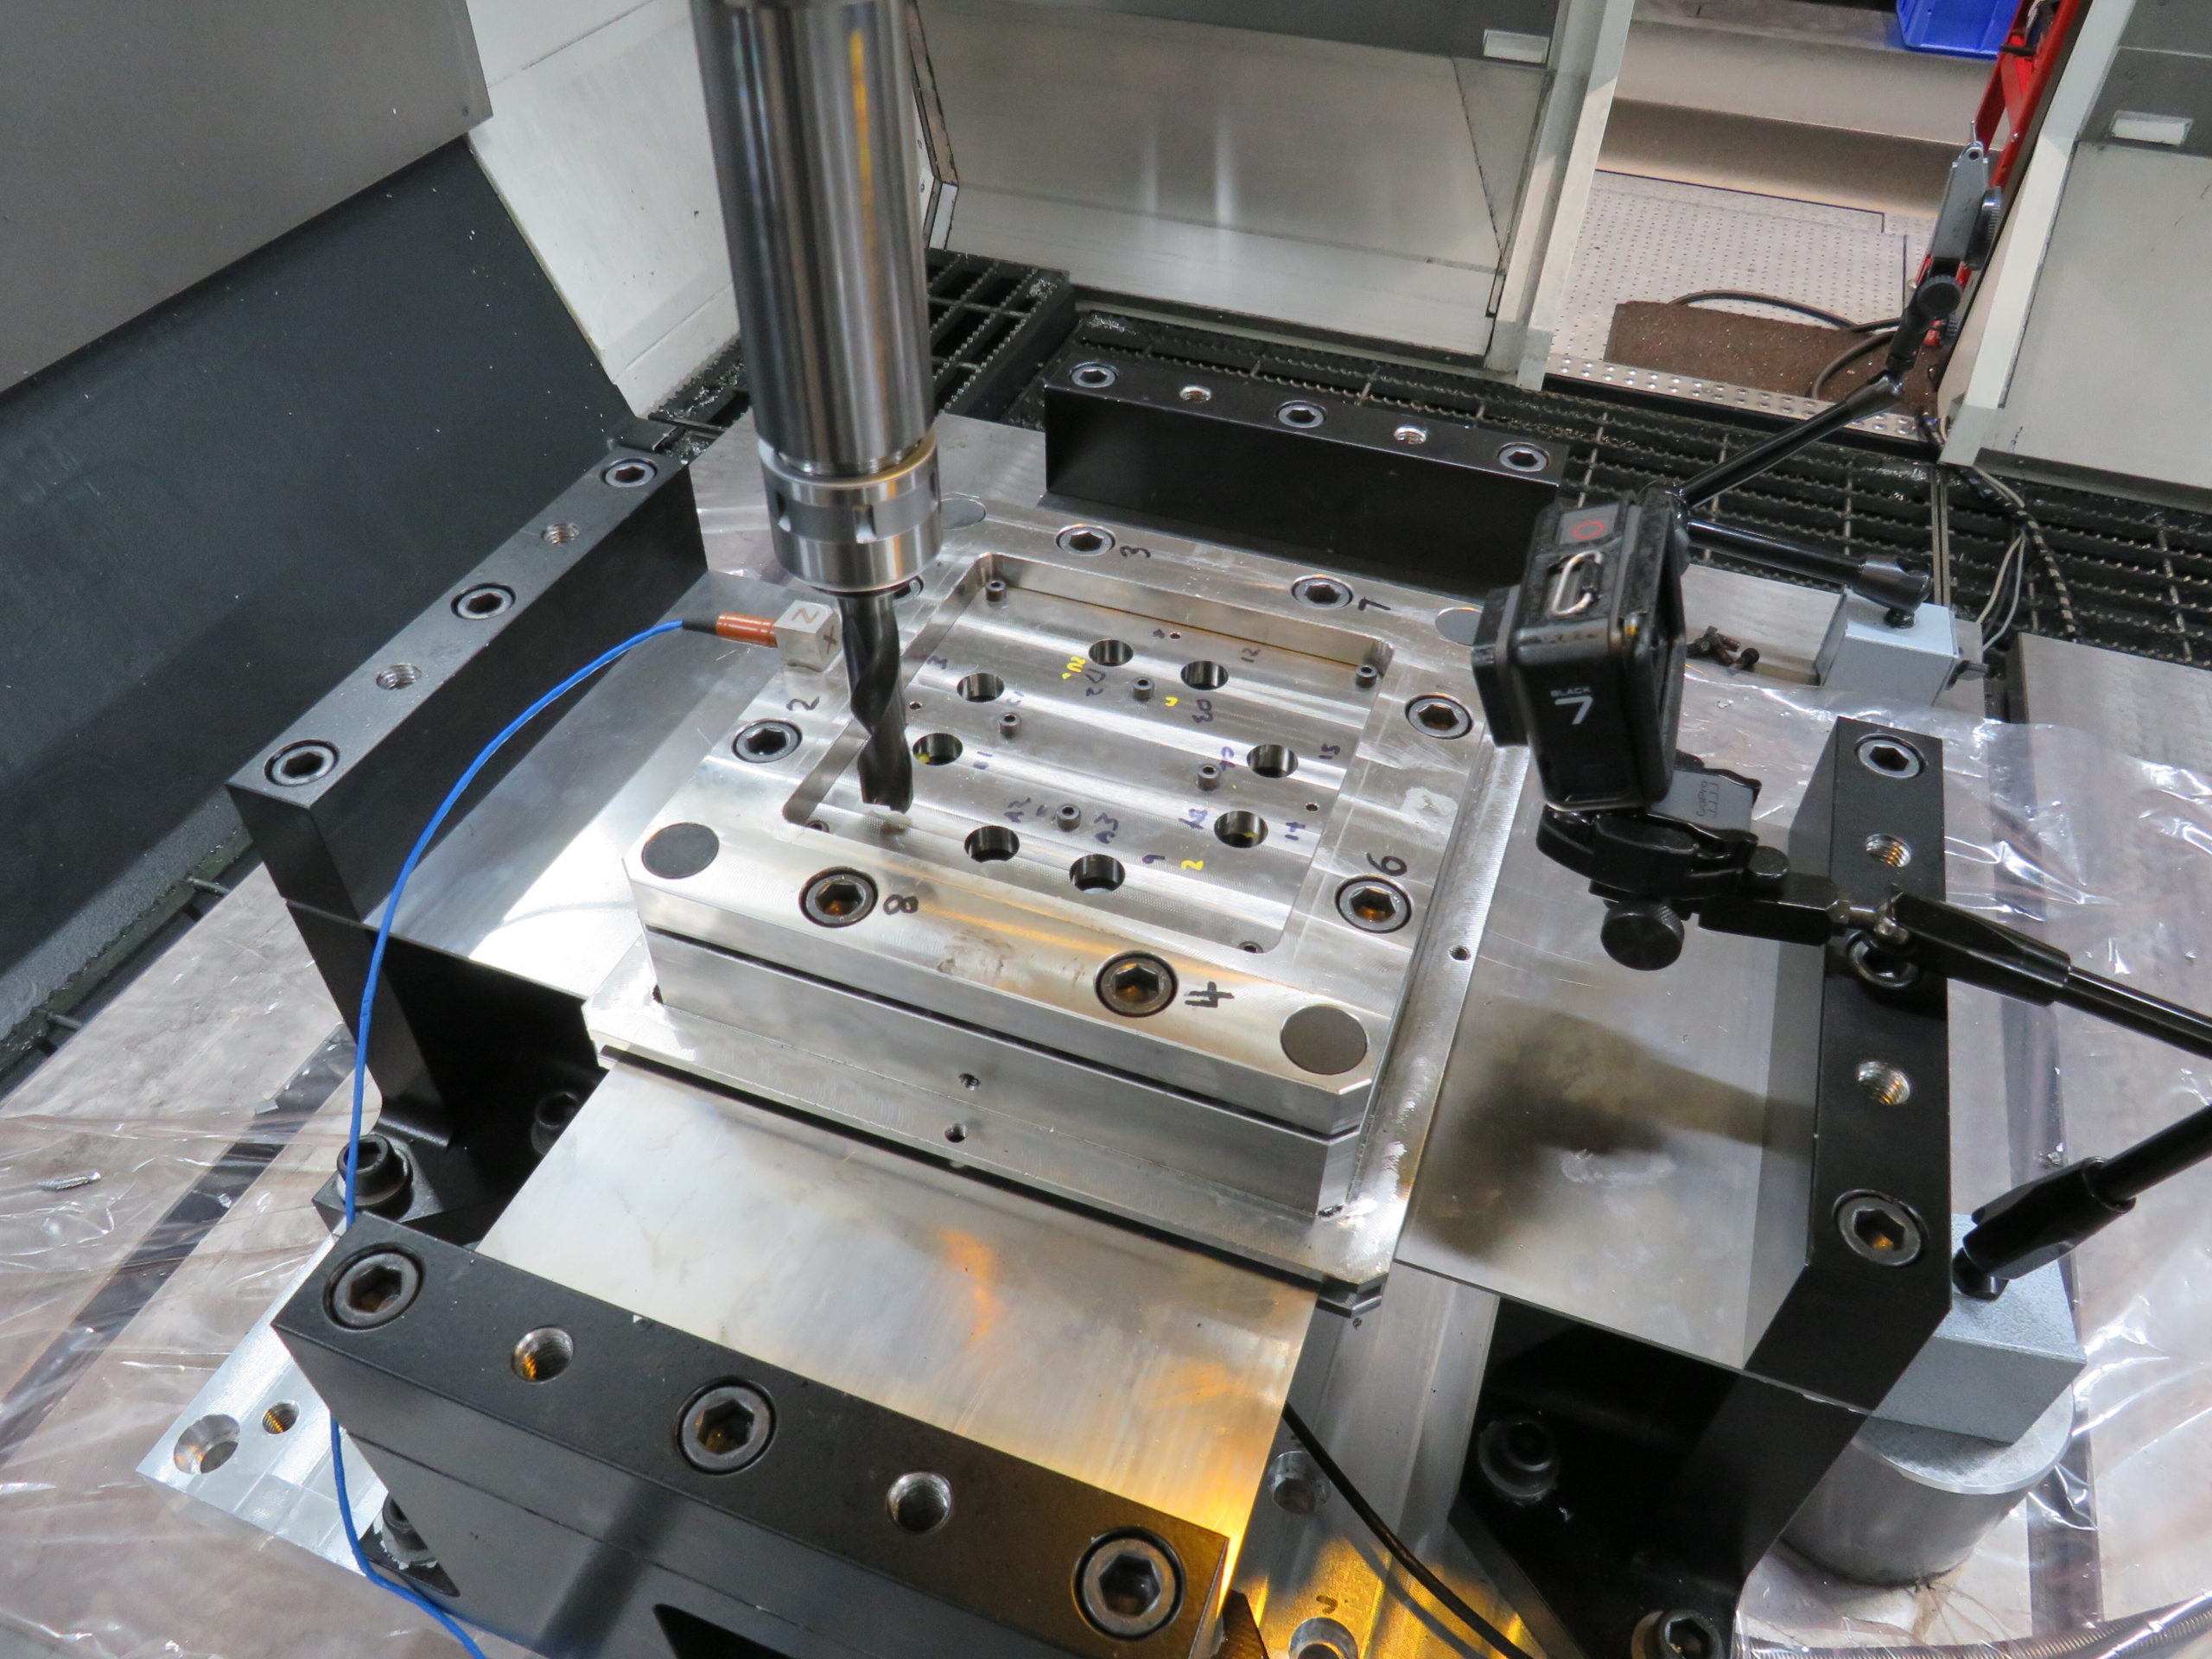
Two years ago, MTD magazine visited the University of Sheffield Advanced Manufacturing Research Centre (AMRC) to take a look at the world’s largest robotic machining cell – the Advanced Robotic Milling System (ARMS), which is part of the AMRC’s program of work on One Way Assembly (OWA). In the two-years since, the OWA project and related technologies have matured significantly and the AMRC has just been awarded £1.01m by the Aerospace Technology Institute (ATI) to fund the ‘One Way Assembly Sensor-based digital verification Technology accelerator’ (OWAST). Rhys Williams visits the AMRC Factory 2050 in Sheffield to find out more.
 Hopefully, with most of the acronyms out of the way, the first point of order is to recap what the One Way Assembly (OWA) project is all about. Now in its third year, OWA aims to produce fastener-ready holes in composite-metallic stacks that fully comply to specification without the need to disassemble, inspect, deburr, clean or rework. This has been a major ambition of the aerospace industry for decades and the AMRC is right at the forefront of this project. The Figure 1 diagram below considers the implementation of OWA as part of the A350 Pylon assembly line. It shows the importance of this project in terms of time compression, cost and labour savings as eye-watering.
Before the Covid pandemic, aero OEMs like Boeing and Airbus were producing at ‘Rate 60’ (60 aircraft a month) with an ambition to reach ‘Rate 100’. But that was before the world came to a grinding halt. Despite many fleets still being grounded, the aero primes have an order backlog of more than 13,000 aircraft that will keep them busy for almost a decade. With worldwide commercial aircraft expected to more than double to beyond 50,000 by 2039, hitting higher production rates remains a key objective despite the pandemic. Hence the importance of the OWA project.
In 2019, MTD magazine reported that an average of 38,000 aircraft needed to be built over 20 years. Working at ‘Rate 60’, this equates to 120 wings a month; with each wing requiring over 5,000 drilled holes, that is more than 380 million holes! More mind-blowing is the fact that this value is for the wings alone, not the entire aircraft. Before Covid, Airbus was drilling 500,000 holes a day and Boeing over 1 million. ARMS, OWAST and a host of additional research projects are all funnelling into the overall OWA objective to speed up the process, as its importance remains colossal to the aero industry. Take another look at the Figure 1 diagram – are you now starting to understand the importance of OWA to the aero industry?
Of course, the challenges for everyone involved in OWA are significant; like the individual projects, the objectives continually evolve. Referring to the holemaking objectives of OWA, AMRC Machining Group Technical Fellow for Hole Generation and OWA Project Lead, Dr Pete Crawforth says: “Airframes of the future are set to contain ever increasing amounts of CFRP in order to meet light weighting targets. However, introducing CFRP into single-aisle aircraft which are commonly manufactured at a high rate poses significant challenges due to the compromised nature of stack machining. Therefore, in order to help facilitate the uptake of CFRP into such aerostructures while maintaining high production rates, complete assemblies must be drilled in-situ without then taking them apart for subsequent inspection or rework, as would be the case in twin-aisle aero manufacturing.”
“To achieve this necessitates a ‘right-first-time’ hole generation approach. Furthermore, as part of building confidence in these OWA processes, the OWAST team is developing high resolution part quality verification techniques. Techniques under development include in-process monitoring for process stability and defect detection and novel non-destructive testing.”
“To make this work, we are bringing together a multitude of technologies and analysis methods. We are not only drilling dissimilar materials that need bespoke solutions, but also developing novel ways of assessing part quality to challenge conventional aircraft assembly methods. What we are doing here is very novel and we are excited to see how these technologies could be applied to other manufacturing processes.”
 The challenge for Dr Pete Crawforth and his team extends far beyond the realms of simply drilling acceptable holes in stack materials, although that is difficult in itself. Drilling processes have the challenges of the dynamic instability and vibration of assemblies, and stringent requirements relating to surface defects and hole tolerance – and did we forget to mention the evacuation of both swarf and CFRP dust that critically cannot remain in a wing structure? Just to give readers a flavour of the challenge: the aero primes undertake up to four different methods for drilling aircraft wings – this includes hand-held tools, robots, gantry type machining centres and electric advanced drilling units. To complicate matters, a 10 or 15m long wing has different component thicknesses – as well as different stiffness and frequency properties – along its entire length.
 What is OWAST?
The £1.01m award by the ATI to fund the OWAST project will result in the implementation of a standardised testing approach that is being developed as part of a previous HVM Catapult funded project. This will include a novel, dynamically tuneable rig for testing OWA hole generation processes. The rig will be portable, compatible with various hole generation platforms, and able to be tuned to suit multiple applications – mimicking the dynamic behaviour of aerospace wing structures, which can undermine the machining process.
This approach will allow industrially representative testing to be carried out more quickly and cost-effectively than testing on full-scale aircraft parts. Furthermore, research work will be conducted to understand the relationship between in-process data gathered during OWA processes and hole quality data by feeding such data into statistical and machine learning models. Imagine being able to infer the quality of a hole with an automated analysis of in-process data without having to disassemble the stack!
Hole-generation testing at the AMRC will be conducted on four platforms: the ultrasonically enabled DMG MORI DMU340G gantry-based platform, the ARMS robotic serial arm, the supercritical CO2 enabled Loxin tricept parallel kinematic machine (PKM) and an electric advanced drilling unit (EADU). Additionally, the project will draw on the non-destructive testing (NDT) expertise of the AMRC’s fellow HVM Catapult centre and the National Composites Centre (NCC), to explore the use of NDT methods appropriate to support the industrial adoption of OWA.
The challenges
To understand the challenges faced by the AMRC OWA hole generation team, first, we must understand the potential issues of actually drilling stack material. For Dr Pete Crawforth and his team, they must consider factors such as delamination, stray uncut fibres, sub-surface cracking, and scratching or scoring of the hole surface in the CFRP. Then, for the metallic stack material, the team must consider poor surface finishes, burrs, contamination, and pull-out of the liquid shim that sits between CFRP and the metallic layers. When considering all this, the team has to optimise the variable cutting parameters whilst factoring in the vibration and rigidity of the wing structure at multiple points – it’s no easy task!

Progressing the OWA program of work
There are a multitude of OWA projects running simultaneously at the AMRC. The projects encompass everything from cutting strategies and dynamics through to database management, process monitoring, data interrogation and verification, inspection, Industry 4.0 solutions and much more. The development of each technology theme is judged against a Technology Readiness Level (TRL) scale. The TRL scale is a common method for estimating the maturity of a technology from inception to deployment. Whilst many of the AMRC projects operate within the fundamental TRL1 start point through to TRL5, technology development from TRL6 to TRL9 necessitates industry collaboration to transition the research from pre-production to full scale implementation.
Following on from previous research undertaken by the OWA team, the latest OWAST project has a solid foundation block that sees some of the technology themes comparable for OWAST to commence at TRL3. The team has developed a prototype test rig that is currently being used in drilling trials and characterised for comparison against dynamic models and tap test data from aircraft assemblies. The next stage will be to demonstrate the ability to drill stacks on the aforementioned four industrially representative machine platforms with the rig dynamics adjusted to mimic dynamic behaviour of aerospace assemblies – like an aeroplane wing.
 When the test rig is proven to comfortably replicate field conditions, the next stage will be to demonstrate in-cycle process monitoring feature extraction. The OWA team has already demonstrated its database and interrogation software architecture, and integrated process monitoring with the OWAST test rig (TRL2). To represent aero assemblies in a production environment, the dynamics of the rig have to be tuneable in terms of mass, stiffness and damping, requiring incorporation of multiple sensors to capture in process cutting forces, acoustic emissions and acceleration. Downstream from this, the team has to capture this data and establish a standardised inspection, analysis and reporting system.
The AMRC has also developed its own in-house inspection processes for measuring key features such as the severity of CFRP delamination and characterising the formation of the metallic burr. Further work is now underway as part of OWAST to establish an inspection protocol using a Bruker Alicona µCMM system that can quantify levels of contamination that can remain between the stack layers following machining.
As Figure 2 opposite shows, there is a detailed process flow and each of the variable parameters relevant to the drilling cycle such as the stack details, machine platform and tooling will respectively result in a multitude of varying outputs during the trial, inspection, hole quality and subsequently the data processing analysis stages.
As Dr Pete Crawforth says: “To establish a new process, you also need to develop key supporting technologies if they currently do not exist or are immature. If all we had to do was drill a good hole, we would have spent the last 18 months drilling lots of holes. We are in the process of setting up a mechanism to be able to prove confidence in the solutions that we can offer.”
The OWAST project is supported by a multitude of industrial partners that include BAE, GKN, Boeing, Airbus, Spirit and Mitsubishi heavy industries (MHI) as the key OEM partners with a vested interest in the success of the project. The system integration partners include Aritex, IPG Photonics, Electroimpact and Siemens with Kwikbolt and Pro Micron integral in the assembly process and process monitoring integration respectively. From a cutting tool perspective, the OWAST team is working closely with Ceratizit, Mapal, OSG, Kyocera Unimerco, Sandvik and Seco tools.

The set-up
With the four different drilling platforms established, a functioning test rig, and support from industrial partners, the next steps for the OWAST team over the next 18 months will be to record unfathomable amounts of data from the drilling of hundreds of holes across the four machining platforms. The process monitoring configuration will incorporate Kistler load cells, accelerometers, acoustic emission sensors, a high-resolution vision system, and a power monitoring kit synced with machine PLC data using NI acquisition hardware and software.
Currently, the data collection requires in excess of 1GB of data per hole. The OWAST team has to correlate, compress and standardise this data whilst refining the pre-processing methods and quality metrics. This will allow determination of a best practice for OWA processes that will integrate with data management frameworks.
 The presentation
The objective for the OWAST team is to create an interactive ‘front-end’ application template that will be a ‘Trial Certificate’ for the OEM manufacturers to apply in the field. At the ‘front-end’ will sit an easy to use and intuitive platform that will provide a proven and trusted outcome based upon the respective OEM’s machining parameters. However, behind this ‘front end’ window will be a system of remarkable depth.
Built into the platform will be a myriad of processed data, modelling tools and decision-making tools. The objective is for the aero primes to utilise an interactive ‘front-end’ application template where they can input their field-based specific parameters, such as the machine tool or process, cutting data and drills, and material parameters. From this, the application template will rapidly draw upon the processed data set to generate a tailored ‘Trial Certificate’ the aero primes can apply in the field – ultimately getting all the OEMs one step closer to their OWA utopia of shorter lead-times, enhanced process reliability, and reduced manufacturing costs.


